Owners are building DIY trail-repair routines with onboard air, smart recovery gear, quick underbody checks, and reversible mods that stay reliable.
The new adventure-SUV crowd is learning a useful truth: the best trail build is often the one that gets you home quietly. That means air in the tires, recovery points that actually work, a quick look underneath, and modifications you can undo on Monday.
Factory Adventure Rigs Are Creating Better DIY Habits
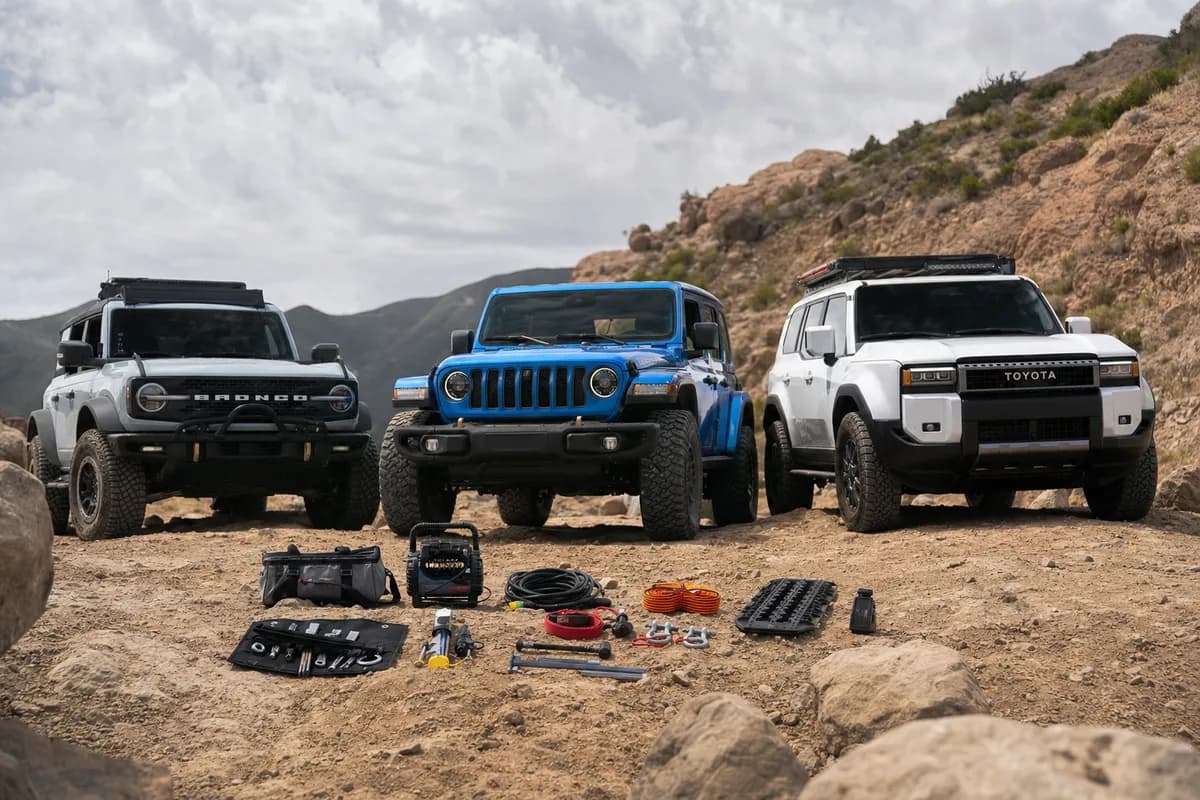
Ford Bronco, Jeep Wrangler 4xe, and Toyota Land Cruiser owners are arriving at trailheads with far more capability than stock SUVs offered a decade ago. Locking differentials, selectable terrain modes, skid plates, all-terrain tires, disconnecting sway bars, hybrid torque, and serious approach angles are now available straight from the dealer.
That factory capability has changed the modification conversation. Instead of immediately chasing a six-inch lift, 37-inch tires, and a roof rack that weighs as much as a refrigerator, more owners are building practical trail-readiness kits around maintenance, recovery, and reversible 4x4 modifications.
The community element matters, too. Local Bronco groups, 4xe owners’ forums, Land Cruiser clubs, and trail-maintenance organizations are sharing torque specs, recovery techniques, scan-tool tips, and post-trail inspection checklists. That is a healthier culture than treating a new $60,000-plus SUV like a disposable social-media prop.
| Model |
What owners commonly protect |
Trail-prep priority |
DIY caution point |
| 2026 Ford Bronco |
Front lower control-arm area, steering components, fuel-tank and transfer-case protection |
Tire repair, onboard air, recovery-point inspection |
Verify bumper and winch mounts are rated for recovery loads |
| 2027 Jeep Wrangler 4xe |
Battery-related underbody protection, suspension links, high-voltage cable routing |
Underbody inspection and careful recovery planning |
Never modify, pinch, or probe orange high-voltage wiring |
| Toyota Land Cruiser |
Skid plates, lower radiator area, rocker panels, rear suspension and spare-tire area |
Air-down equipment, rock protection, cargo organization |
Account for hybrid-system packaging before adding armor or wiring |
Onboard Air Is the Upgrade You Use Every Trip
If there is one item that belongs at the top of a DIY recovery gear checklist, it is a dependable air compressor. Airing down improves ride quality, enlarges the tire contact patch, and lets the tire conform to rocks, roots, and loose terrain instead of bouncing across it.
For most stock-size all-terrain tires, owners commonly air down into the high teens or 20s psi on moderate trails, then reinflate before highway driving. The correct pressure depends on tire construction, vehicle weight, terrain, speed, and whether beadlock-capable wheels are involved, so use conservative settings until you know how your rig behaves.
- Portable compressor: Choose a unit with a realistic duty cycle and a hose long enough to reach every tire.
- Accurate tire gauge: Do not trust the compressor gauge alone; a quality handheld gauge is cheap insurance.
- Deflators: Screw-on or valve-core-removal deflators make the process faster and more consistent.
- Tire repair kit: Carry plugs, insertion tools, valve cores, a valve-core tool, and gloves.
- Spare-tire access plan: Make sure a loaded cargo area, rear carrier, or recovery board does not block your spare.
A hard-mounted compressor is a nice convenience, but it is not automatically the best choice. A portable unit can move from vehicle to vehicle, avoids permanent wiring, and fits the reversible-mod philosophy nicely. Owners who do mount air systems should use properly sized wire, circuit protection, heat shielding, and weatherproof connections.
For 2026 Ford Bronco DIY mods, a compressor mount, quick-disconnect fitting, and organized tire-repair kit deliver more real-world value than cosmetic bolt-ons. The same applies to the Land Cruiser, where cargo space and long-distance travel often make a compact, well-secured air setup especially useful.
Recovery Gear Is Not Decoration
Recovery equipment should solve a problem without creating a bigger one. A snatch strap draped across a bumper, a pair of decorative shackles, or a winch mounted to an unverified bracket may look trail-ready, but none of it is a substitute for understanding load paths and rated attachment points.
Never recover from a trailer ball, a non-rated tie-down loop, or an unknown bumper tab. Recovery loads can multiply quickly when a vehicle is buried, hung up, or yanked with slack in the line.
Carry gear matched to the vehicle’s gross weight and the type of travel you do. Read the working-load limits, inspect every strap and shackle before use, and establish a recovery zone that keeps bystanders away from a loaded line.
- Rated recovery points: Front and rear points designed for vehicle recovery, not shipping or tie-down duty.
- Kinetic recovery rope or recovery strap: Use a purpose-built, rated product with no cuts, melted fibers, or damaged stitching.
- Soft shackles: Lightweight and useful, but still subject to abrasion and heat damage.
- Winch extension and tree-saver strap: Necessary if a winch-equipped vehicle is part of the group.
- Traction boards: Useful for sand, snow, mud, and shallow ruts; mount them securely and away from radiator airflow.
- Gloves, shovel, and first-aid kit: The simple tools often do the most work.
The 2027 Jeep Wrangler 4xe trail maintenance conversation adds one extra rule: know what is under the vehicle before digging, jacking, or dragging it over an obstacle. The 4xe’s electrified hardware deserves the same respect as any high-voltage vehicle system. If orange cables, battery shielding, connectors, or cooling hardware appear damaged, stop and have the vehicle professionally inspected.
Make Underbody Checks Part of the Trail Day
The best time to find a loose skid-plate bolt is before it becomes a rattling noise on the highway home. A five-minute walk-around at the trailhead and another one after the drive can catch leaks, hanging wires, tire damage, and missing hardware while the evidence is still fresh.
- Look under the front bumper for bent brackets, loose splash shields, and damaged air dams.
- Inspect tires for sidewall cuts, embedded rocks, torn valve stems, and new bulges.
- Check skid plates, rock rails, crossmembers, and shock mounts for fresh impacts or loose fasteners.
- Look for drips from engine oil, transmission fluid, transfer case, differential housings, coolant, or brake lines.
- Inspect steering linkage, CV boots, sway-bar links, and brake hoses for contact damage.
- After a water crossing, check fluids according to the manufacturer’s maintenance guidance and listen for bearing noise.
This routine is especially valuable on a Toyota Land Cruiser, where owners often rack up long highway miles before and after the trail. Toyota Land Cruiser off-road upgrades should support that dual-purpose mission: protection where it is needed, storage that does not rattle, and service access that remains easy.
Do not confuse skid plates with invincibility. Factory and aftermarket armor can prevent damage from glancing contact, but repeated hard impacts can bend mounting points, trap mud, and transfer force into parts behind the plate. Clean debris out after muddy trips, particularly around heat shields, wiring, and cooling components.
Choose Reversible Mods Before Big, Permanent Builds
Reversible 4x4 modifications are popular because they protect resale value, preserve factory driving manners, and let owners learn what their vehicles actually need. A stock Bronco Badlands, Wrangler Rubicon 4xe, or Land Cruiser already has a capable baseline; use it long enough to identify its genuine weak points.
Start with upgrades that improve reliability, visibility, or recovery without permanently changing suspension geometry or loading the roof with unnecessary weight. Keep every factory part, label removed hardware, and photograph wiring before making changes. Future-you, the next owner, and the technician diagnosing an electrical issue will appreciate it.
- Quality all-terrain tires in a sensible stock-compatible size
- Rock rails or bolt-on side protection
- Removable cargo drawers, tie-down systems, and fire-extinguisher mounts
- Auxiliary lighting on fused, relay-controlled harnesses
- Skid-plate upgrades that retain drainage and service access
- Portable power, air, and tire-repair equipment
Be cautious with heavy steel bumpers, oversized spare tires, roof tents, and tall lifts. They can affect braking, steering feel, fuel economy, headlight aim, suspension wear, cooling airflow, and payload. On the Wrangler 4xe, additional mass also changes how the vehicle manages its already substantial curb weight.
The Verdict: Build for the Drive Home
The strongest DIY trail community is not defined by who has the tallest truck or the most expensive accessory catalog. It is defined by owners who can air down safely, spot a damaged tie rod, recover a stuck vehicle without gambling on a tow ball, and make a clean repair before the next outing.
Start small, carry equipment you understand, and inspect the vehicle after every real trail day. The 2026 Ford Bronco, 2027 Jeep Wrangler 4xe, and Toyota Land Cruiser are all capable platforms, but practical preparation is what turns factory capability into reliable weekend adventure.
Frequently Asked Questions
What are the best 2026 Ford Bronco DIY mods for trail reliability?
Start with a compressor, tire repair kit, accurate gauge, rated recovery gear, and protection for areas your specific Bronco trim exposes. Rock rails, sensible all-terrain tires, and a well-installed auxiliary-light harness are also useful upgrades that do not fundamentally change the vehicle.
What trail maintenance does a Jeep Wrangler 4xe need after off-roading?
Inspect tires, suspension links, skid plates, brake lines, steering components, and the underbody after every trail trip. Pay special attention to any damage near orange high-voltage cables, battery protection, or electrical connectors, and have suspected hybrid-system damage checked by a qualified technician.
Which Toyota Land Cruiser off-road upgrades are worth doing first?
Prioritize recovery equipment, onboard air, tire repair supplies, rock protection, and cargo organization before chasing major suspension changes. Choose bolt-on accessories that preserve ground clearance, cooling airflow, and access for regular service.
What should be in a DIY recovery gear checklist?
A basic kit includes rated recovery points, a recovery strap or kinetic rope, soft shackles, traction boards, gloves, a shovel, and a tire-inflation and repair setup. Add a winch extension and tree-saver only if your group has a properly installed winch and knows how to use it safely.
Get the latest car reviews in your inbox
Join thousands of car enthusiasts. No spam, unsubscribe any time.






Comments
Leave a comment